Semi-auto Water Balloon Launcher
Written by Drenchenator
Last updated on 2007-11-26
- Specifications
- Introduction
- Materials
- Tools and Glues
- Construction
- Use and Maintenance
- Potential Upgrades
- Pictures
- Relevant Forum Links
Specifications
- Range - Untested
- Propulsion - Air Pressure
- Valve - Semi-Auto Piston
- Date build - August to September 2005
- Purpose - Example of Ergonomic and Practical Design
Introduction
The Idea
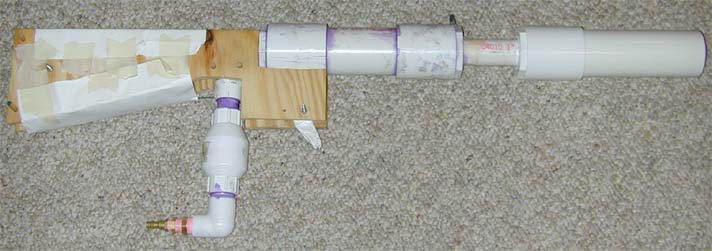
In early July 2005, an idea struck me for an effective bolt-action air pressure Nerf gun. By August, the gun was being fabricated; by September, it was finished. The idea centered around a special piston-style valve which limits air usage. The gun shot a dart an unbelievable 250 feet and was accurate at 150 feet. However, my bolt-action system lacked the quality of the rest of the gun; it was held together by duct tape. Still, the online Nerf community had not seen high range, accuracy, practicality, and ergonomics in one package.
Months passed and I frequented the online water gun forums. Many builders were talking about the future of water balloon launchers: automation. To spark new ideas and launchers, I posted a photo of this gun with a barrel for water balloons. More designs came out; none were built because they were not designed to be built. This gun functions as half of a bolt-action or semi-auto water balloon launcher; it needs a barrel, bolt-action assembly, and larger chamber.
I would modify this design to make it more powerful. 6" of 2" PVC is great for Nerf, but bad for water ballooning. A whole foot of 3" PVC with a 2' 3" barrel should excel. Moreover, I would remove the middle spacer in each of the O-ring sets and replace it with another O-ring for a better seal.
The Valve
O-rings are mounted to a shaft to create two seals at a time. One seal prevents flow out the back. The other two control the flow to the barrel. Normally, the first seals at the end of the chamber. With the trigger pulled, the first seal opens and the middle one closes, preventing air from filling the chamber. Therefore, only the air in the chamber leaves.

Previous designs worked on the same concept: one valve closes and another opens. However, this valve's entire shaft can be removed for maintenance to prolong the life of the valve.
This valve opens faster and easier than a ball valve. Nonetheless, a solenoid sprinkler valves opens much faster than both.
The Trigger
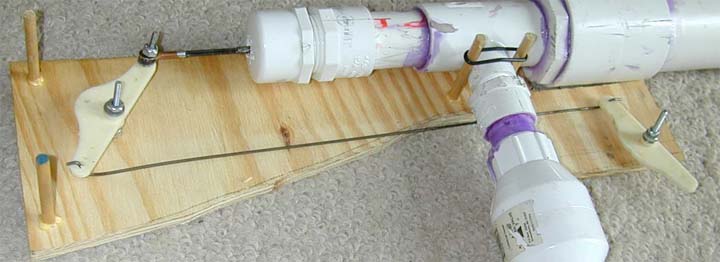
Two bellcranks operate as a sturdy trigger system. A simple pull on the trigger retracts the piston and opens the valve. Furthermore, the piston's return spring doubles as the trigger's return spring.
Materials
- 1/4" Wooden Dowel
- 1/4" Plywood Board
- Bellcrank (x2)
- 1/8" Steel Wire
- 1" OD 7/8" ID O-ring (x7)
- Bolts
- Nuts
- Washers
- 3.25" Spring 3/4" diameter
- 1/2" Schedule 40 PVC
- 1" Schedule 40 PVC
- 2" Schedule 40 PVC
- 1" Threaded Cap
- 1" Male Adapter
- 1" to 1/2" Female Threaded Tee
- 1/2" Male Adapter
- 1/2" Non-Threaded Check Valve
- 1/2" Non-Threaded to 1/2" Threaded Female Bend
- 2" Coupler (x3)
- 1" to 2" Bushing (x3)
- 1/2" Coupler (x2)
- 1/2" Cap (x2)
- 1/4" Copper Pipe
Tools and Glues
- Saw
- Drill with 1/4" and 1/8" bits
- File
- Lathe (optional)
- PVC Cement
- PVC Primer
- Wood glue
- Soldering Iron
- Solder
- Hammer
Construction

Stock
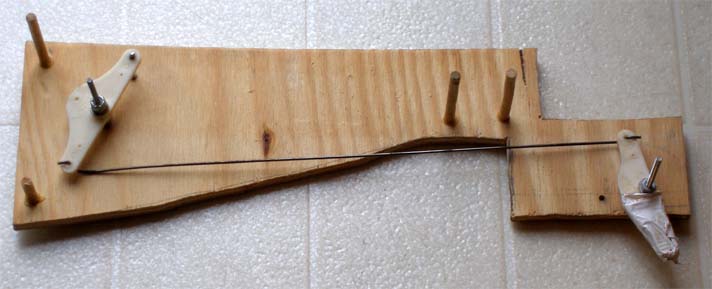
- Follow this template and cut out two panels (should be about 15.25" by 5").
- Drill out holes in panels (large holes 1/4", small holes 1/8").
- Cut 4 2.5" dowels.
- Glue dowels into one panel.
- Cut 14" steel rod; bend as shown.
- Place bolts, washers, bellcranks, and nuts on as shown below.
Chamber
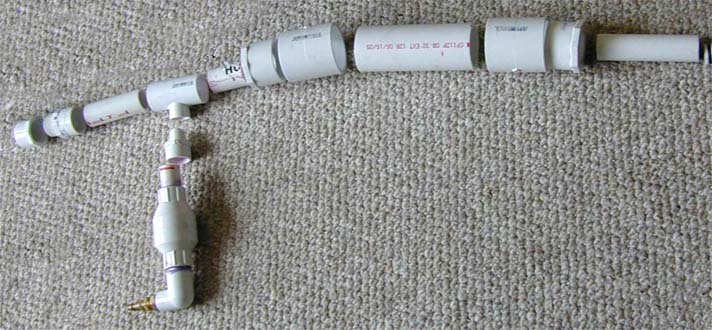
- Cut out 6" of 2" PVC, 2" of 1" PVC, 3" of 1" PVC, and 1" of 1/2" PVC (x2).
- Grab 2 2" couplers, 2 2" to 1" bushings, a 1" to 1/2" female threaded tee, a 1/2" male adapter, a 1/2" check valve, and a 1/2" Non-Threaded to 1/2" Threaded Female Bend.
- Arrange, prime, and solvent weld as shown.
Piston
- Cut out 14" of 1/2" PVC.
- Cut of 8 1/8" sections of the 1/2" couplers.
- Arrange the 8 sections and a 1/2" cap as shown below.
- One set at end with 1/2" cap
- One set 3/4" from other end.
- One set 5.5" from non-capped end.
- Prime and solvent weld spacers to 14" shaft.
- Sand sections until they fit easily into 1" Schedule 40 PVC.
- Drill 1/8" hole through pipe at cap-less end about 1/4" in from end.
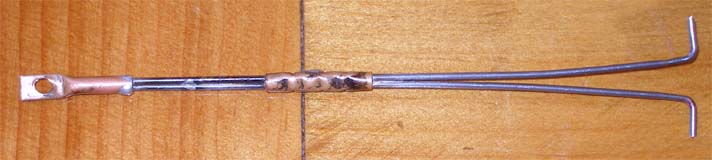
- Make metal part using 1/4" copper pipe, and two lengths of 1/8" steel rod.
- Cut two small 1" sections of copper pipe.
- Cut two 6" steel rod sections.
- Arrange as shown.
- Join together solder as shown.
- After it cools, flatten end with hammer and drill a small 1/8" hole. Bend as shown.
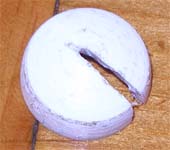
- Sand second 1/2" cap enough to fit in 1" PVC. Cut short and cut line 3/4 of the way down as shown below.

Barrel
- Cut 6" of 2" PVC.
- Prime and solvent weld with 2" coupler and 2" to 1" bushing.
Final Steps
- Lubricate piston.
- Place piston into chamber from end.
- Place metal part into 1/8" holes at end.
- Put special cap in as shown.
- Push piston in more and put in spring.
- Drill 1/4" hole in 1" threaded cap.
- Place 1" male adapter on end.
- Screw on 1" cap. Let the metal part come out of hole.
- Mount into panel with holes.
- Attach metal piece to trigger system.
- Put on second panel and screw on.
- Attach barrel; prime and solvent weld if desired.
Use and Maintenance
To use in a battle, a large air storage tank is needed. The tank should be attached to the input by the check valve. The gun meters the air, providing many slots without pumping.
The O-rings will degrade and the piston will need more lubrication. The builder should periodically remove, replace, and lubricate the piston and O-rings. Likewise, the piston may eventually need replacement.
Potential Upgrades
- To get more power, the pressure chamber should be made from 3" instead of 2" PVC. The barrel should also be 3".
- A bolt-action assembly should improve rate of fire.
- An air reservoir should provide air during battles.